Smart Switch Board
Project Overview
This project turns regular electrical switches into smart switches that can be controlled remotely. It combines hardware design, embedded programming, cloud connectivity, and mobile app development.
Users can control lights, fans, and other devices in two ways: using physical switches on the wall or through a Flutter mobile app. The system uses BLE (Bluetooth Low Energy) for WiFi setup, MQTT for cloud communication, and NVS storage to remember settings after power off.
My Approach
I built this project from scratch, handling everything from design to deployment:
- Mechanical Design: Made CAD models for the switch box and buttons
- Circuit Design: Designed a custom perf board that connects relays, MOSFETs, and ESP32 to safely switch high-voltage devices
- Embedded Firmware: Wrote ESP32 code using ESP-IDF that handles WiFi, MQTT, BLE provisioning, NVS storage, and GPIO control
- Cloud Integration: Set up a cloud MQTT broker with TLS security for remote access
- Mobile Application: Built a Flutter app for WiFi setup and device control
Hardware Design & Development
CAD Modeling
I designed the physical parts using CAD software:
- Button placement for easy use
- Air holes for cooling relays and MOSFETs
- Mounting points for the circuit board
- Clean look suitable for homes
Perf Board Circuit Design
The circuit board includes:
- ESP32 Microcontroller: Handles all the logic, WiFi, BLE, and MQTT
- Relay Modules: Switches high-voltage AC loads like lights and fans
- MOSFET Drivers: Controls relays using low-power signals from ESP32
- Power Supply Circuit: Converts AC mains to 5V and 3.3V DC
- Isolation & Protection: Uses optocouplers to separate low-voltage control from high-voltage loads
Project Gallery
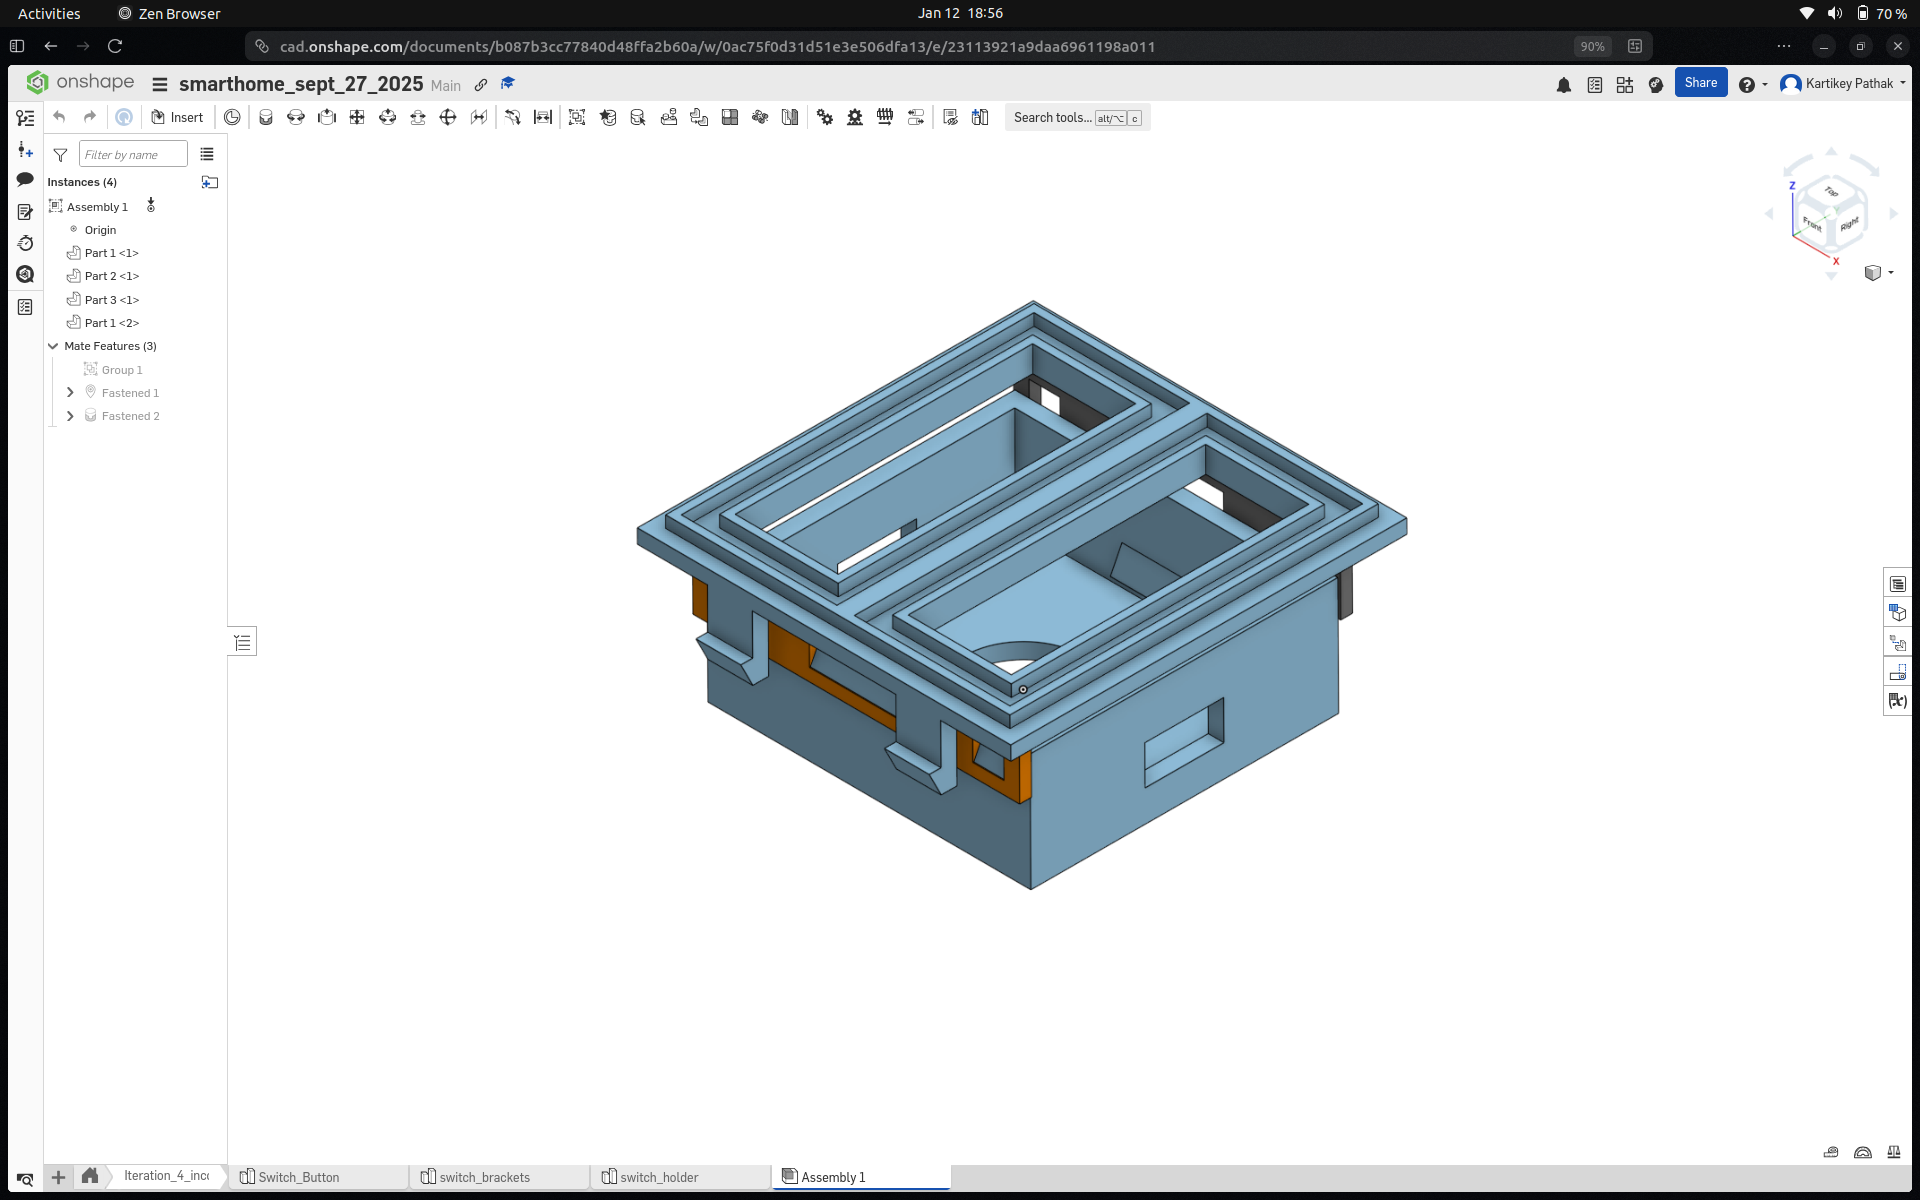
CAD Model of the switch button and box
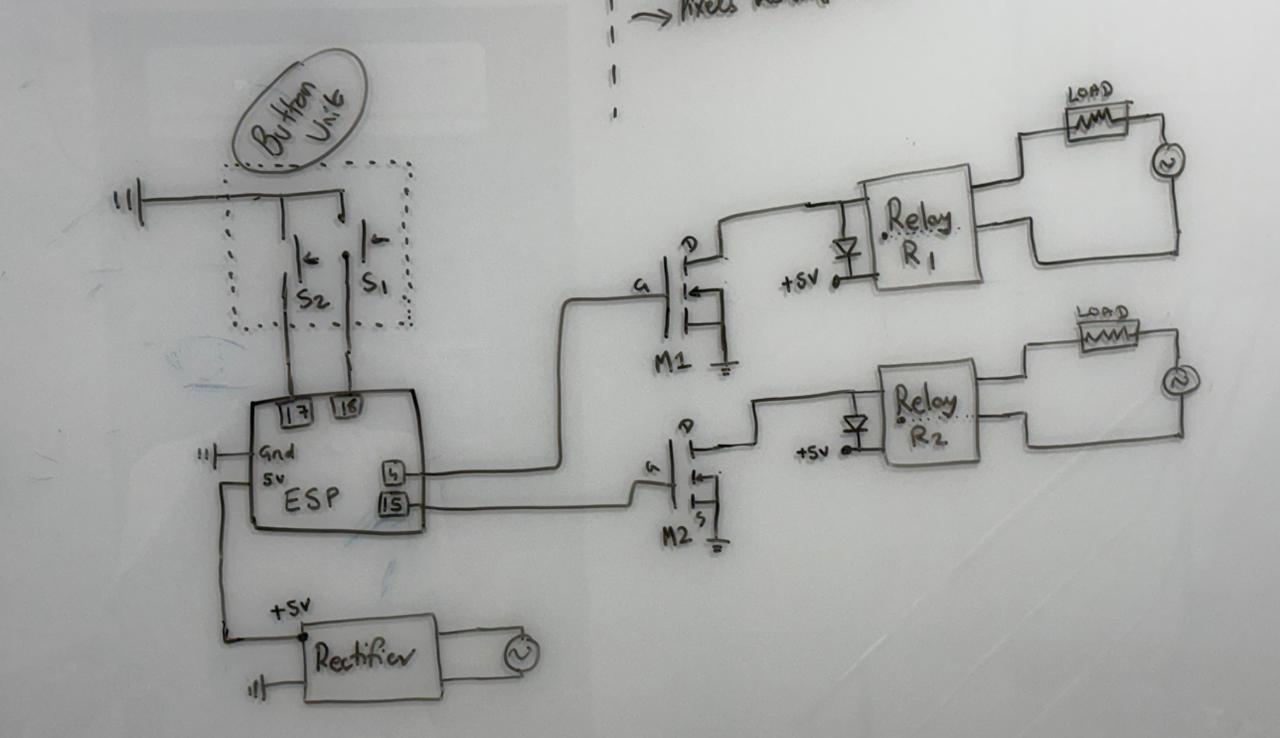
Circuit diagram showing ESP32, relays, MOSFETs, and power supply
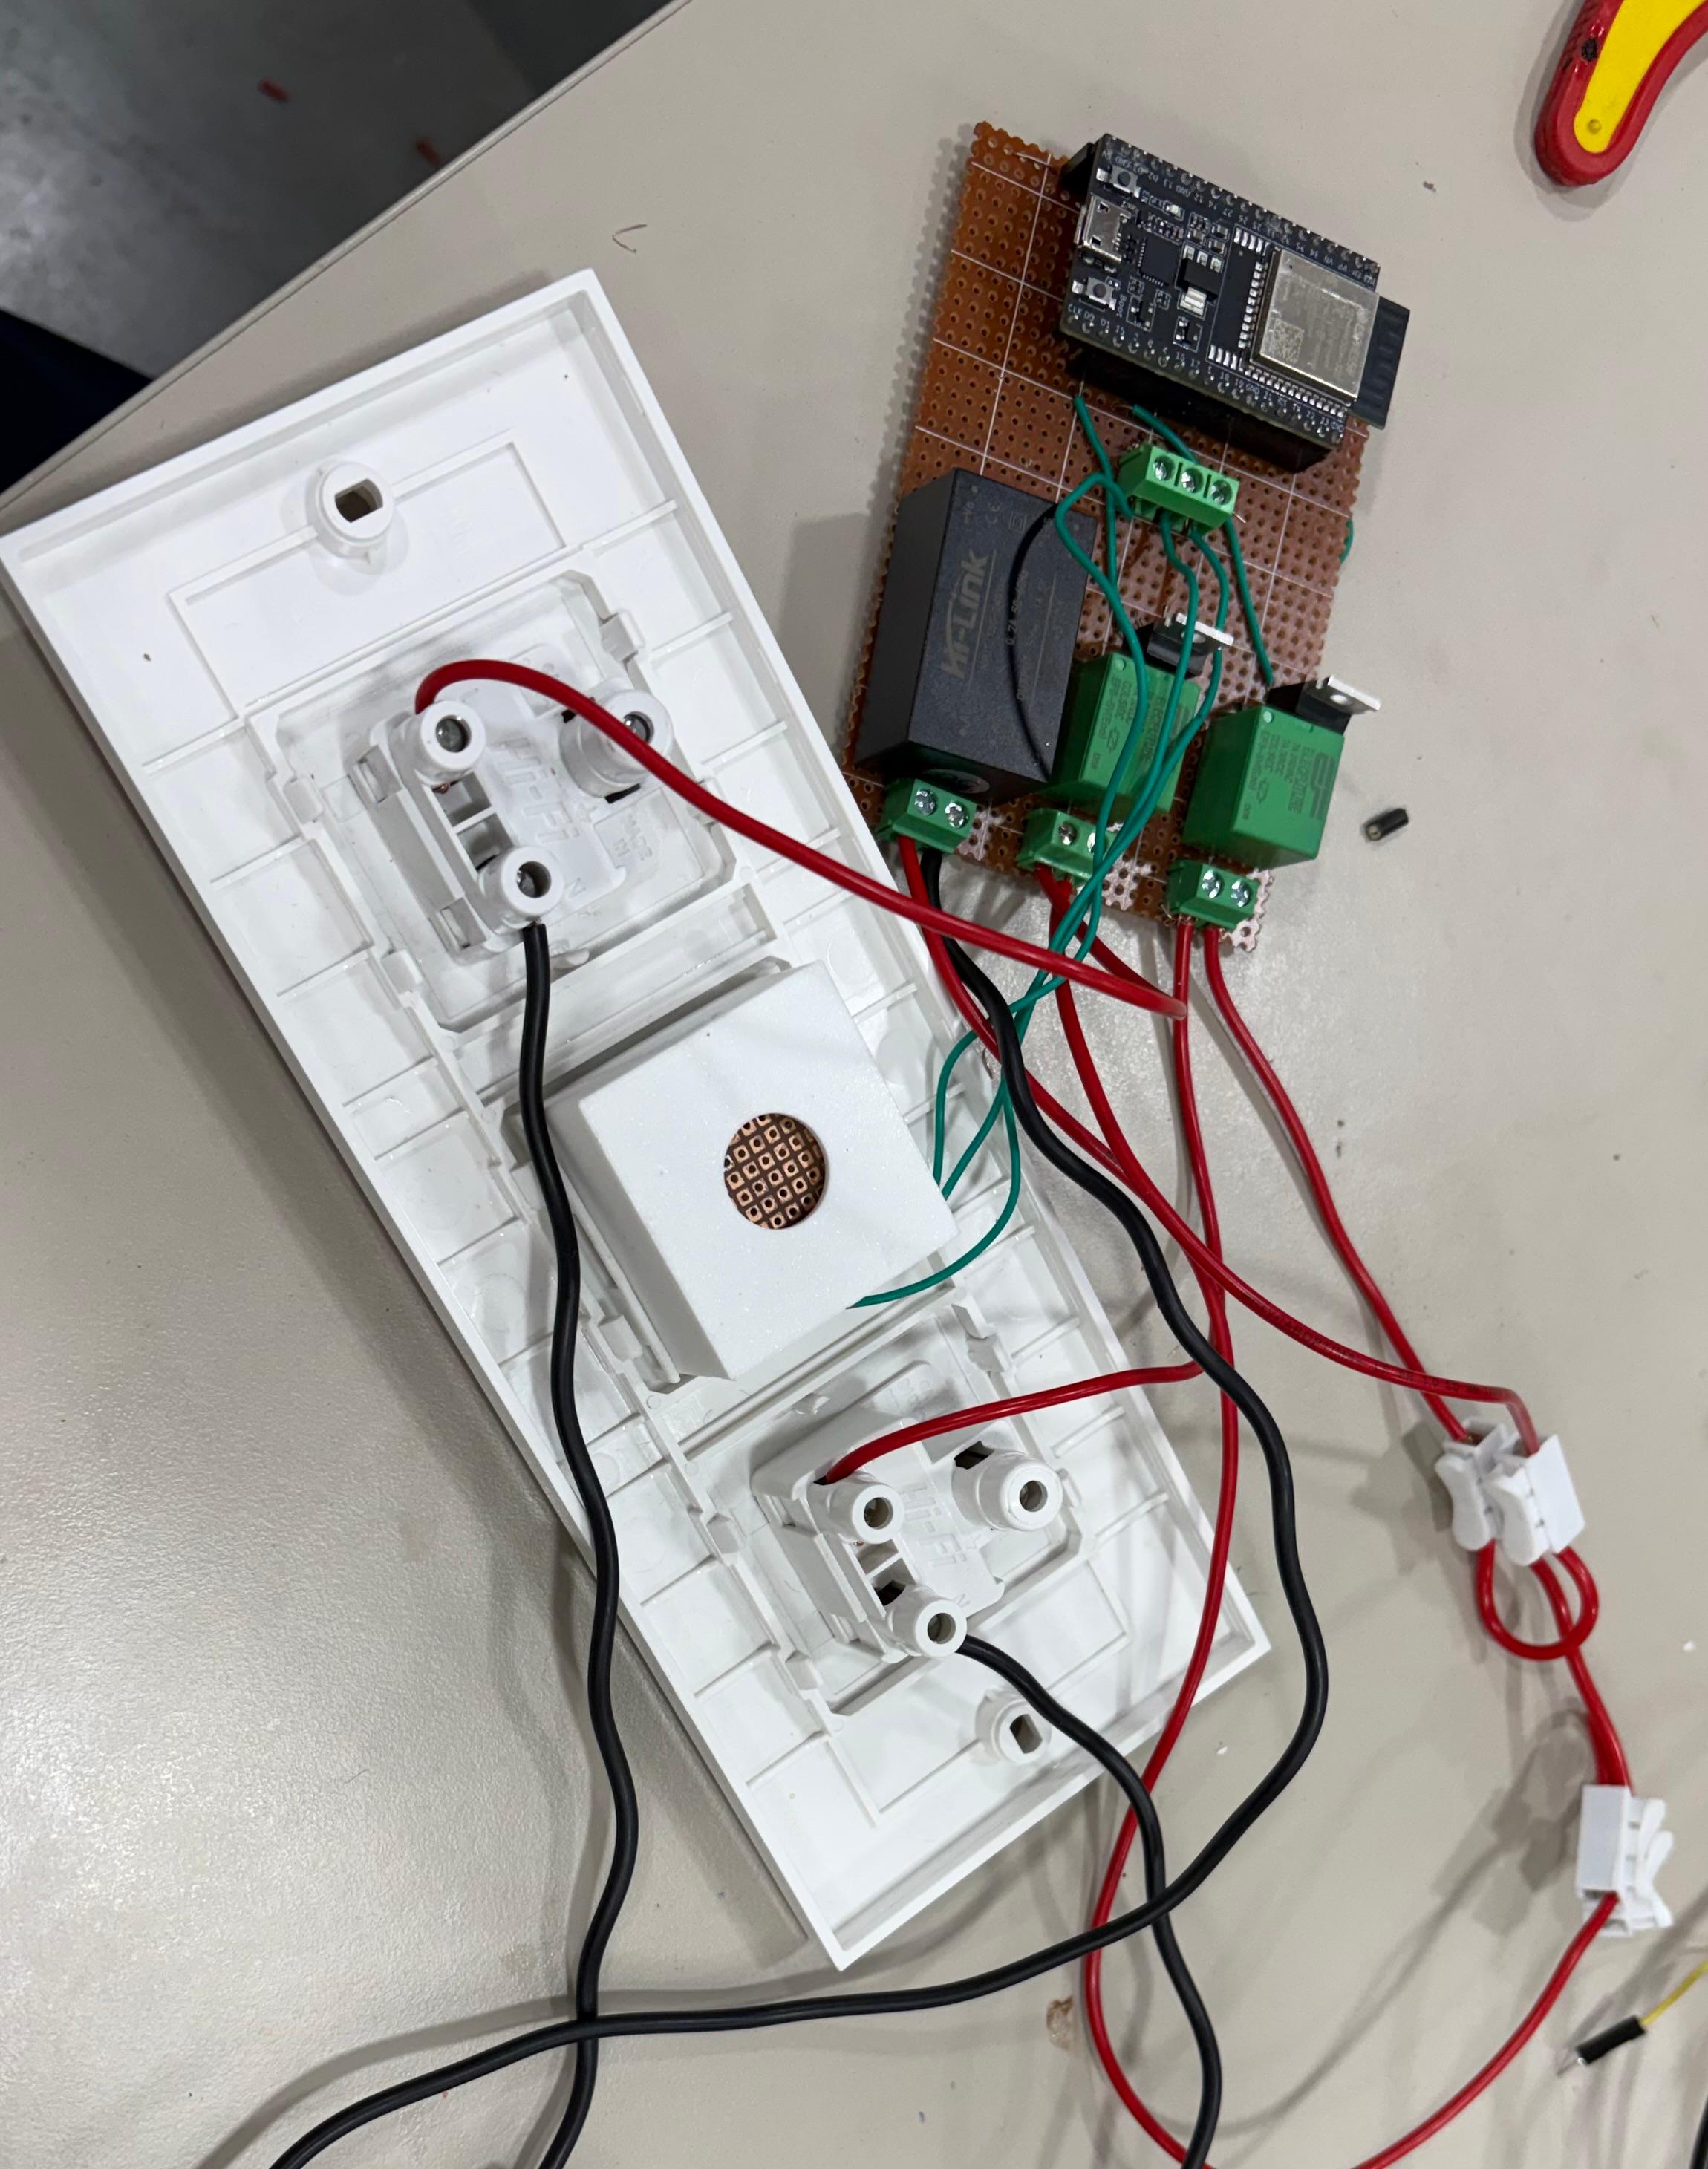
Perf board with ESP32, relay modules, and MOSFET drivers
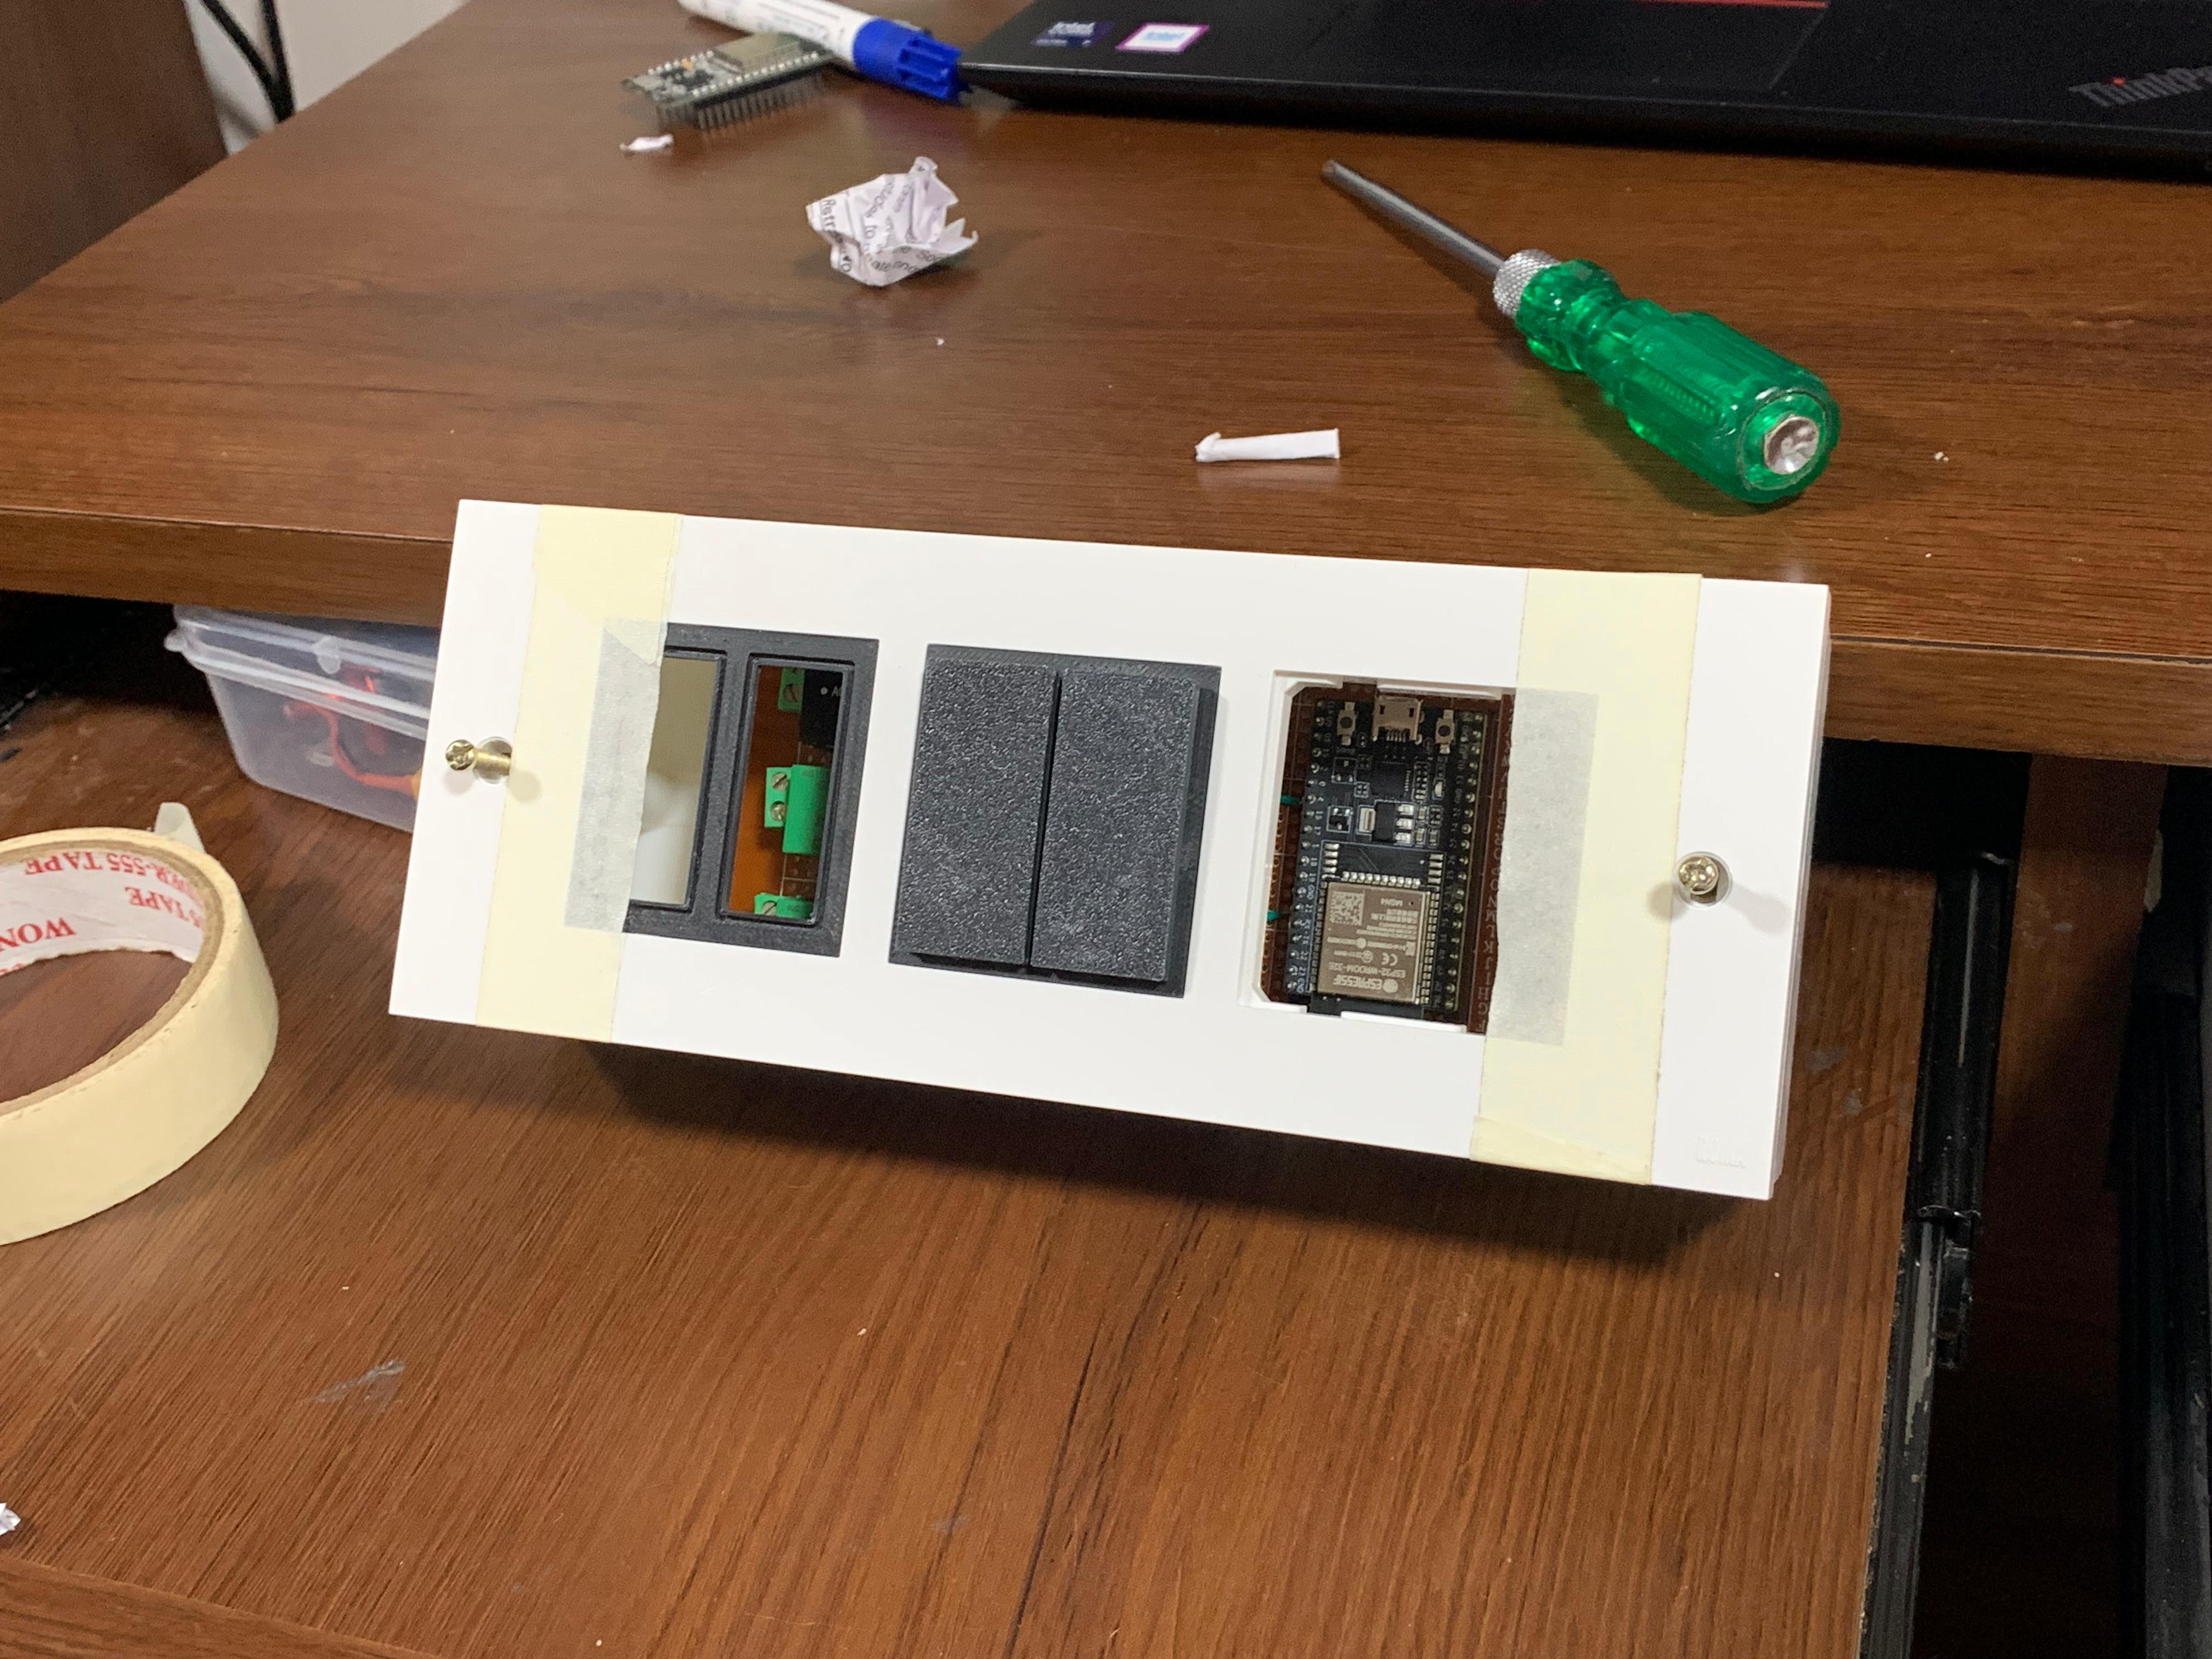
Final product installed and working
App Demo video.
Demo video for button control.
ESP32 Firmware Architecture
Overview
The ESP32 firmware has these features:
- ✔ WiFi + MQTT for remote control
- ✔ BLE provisioning to set WiFi credentials from the phone
- ✔ NVS storage to save settings permanently
- ✔ GPIO control for lights, fans, and sockets
- ✔ Physical buttons for manual control
- ✔ MQTT JSON commands to rename board and devices
- ✔ Heartbeat messages every 5 seconds for status updates
- ✔ TLS security using certificates
Core Components
1. Device Management
The system controls 6 devices. Each device has:
- Fixed Name: A permanent ID used for MQTT topics
- Display Name: User can change this (like "Living Room Light")
- Device Type: Light, fan, socket, etc.
- GPIO Mapping: Which pins control the LED and button
- State: ON or OFF
- MQTT Topics: Automatically created for each device
2. BLE Provisioning System
BLE provisioning lets you set up WiFi without hardcoding it:
- Creates a GATT service that the phone app can find
- Receives WiFi SSID and password as JSON from the app
- Generates a unique board ID from the MAC address
- Saves everything to NVS storage
- Reboots to connect with new WiFi settings
JSON Format:
{"ssid":"MyWiFi","password":"12345678"}
3. MQTT Communication
MQTT is used to send and receive messages:
-
Command Topic:
smart_switch/<board_id>/<device>/command -
Status Topic:
smart_switch/<board_id>/<device>/status -
Info Topic:
smart_switch/<board_id>/info -
Rename Topic:
smart_switch/<board_id>/rename
Commands you can send: ON, OFF, TOGGLE, STATUS
4. NVS Storage
These settings are saved even after power off:
- WiFi SSID and password
- Board ID
- Setup completion flag
- Device display names
5. GPIO & Button Handling
Physical buttons work like this:
- Button press triggers an interrupt
- Debouncing prevents false triggers
- Device state toggles instantly
- Status is published to MQTT automatically
6. Heartbeat System
Every 5 seconds, the board sends this JSON:
{
    "board": "esp_12ab34",
    "devices": [
        {"id": "light_1", "name": "Living Room", "type": "light"},
        {"id": "fan_1", "name": "Bedroom Fan", "type": "fan"},
        ...
    ]
}
This keeps the app updated with the latest status.
7. Renaming System
You can rename the board or devices using MQTT:
-
Rename Board:
{"type":"board","new_name":"home_01"} -
Rename Device:
{"type":"device","target":"light_1","new_name":"Dining
                            Light"}
The system checks the name is valid, saves it to NVS, updates MQTT topics, and confirms the change.
How the Firmware Boots Up
- Initialize NVS: Start the storage system
- Initialize Network: Set up WiFi and event handling
-
Check Setup Status:
- Read the setup flag from NVS
- Load WiFi credentials and board ID
- Load Device Names: Get custom names from NVS
-
If Setup is Done:
- Show board and device info
- Set up button GPIO with interrupts
- Set up LED GPIO as outputs
- Connect to WiFi
- Start MQTT client
- Subscribe to command topics
- Start sending heartbeat messages
-
If Setup is NOT Done:
- Use default board ID
- Start BLE provisioning
- Wait for phone app to send WiFi details
Flutter Mobile App
The mobile app is built with Flutter and lets you:
- BLE Provisioning: Set up WiFi by scanning for the switch via Bluetooth and sending credentials
- Device Discovery: Find smart switches on your network
- Device Control: Turn devices ON/OFF in real-time
- Device Renaming: Change board and device names
- Status Monitoring: See live device states
The app was "vibe coded" - built quickly with focus on making it easy to use.
Technical Details
WiFi & Network
- ESP32 works as a WiFi client (STA mode)
- Reconnects automatically if WiFi drops
- Gets IP address using DHCP
- Resolves MQTT broker address using DNS
MQTT Setup
- Uses TLS 1.2 encryption with certificates
- Connects to cloud MQTT broker (HiveMQ, AWS IoT, etc.)
- QoS Level 1 ensures messages are delivered
- Last Will and Testament (LWT) detects when device goes offline
- All data is sent as JSON
Security
- TLS encryption for MQTT
- Certificate-based authentication
- NVS storage can be encrypted
- Validates all commands and names
- Prevents command injection attacks
Power Management
- Relays are isolated to prevent feedback
- MOSFETs control relays efficiently
- Power supply has overcurrent protection
- Design allows heat to escape during operation
Technologies & Tools
Challenges & Solutions
Challenge 1: High-Voltage Safety
Problem: Need to control 220V AC using 3.3V signals from ESP32 without danger
Solution: Used optocoupled relays and MOSFETs to completely isolate low voltage from high voltage circuits
Challenge 2: Easy WiFi Setup
Problem: Users shouldn't need to reprogram the device to change WiFi
Solution: Built BLE provisioning - the phone app sends WiFi details via Bluetooth, ESP32 saves them to NVS
Challenge 3: Keeping Everything in Sync
Problem: App, physical buttons, and remote commands need to stay synchronized
Solution: Used MQTT pub/sub - every state change publishes a status update. Heartbeat messages every 5 seconds keep everything synced
Challenge 4: Renaming Devices
Problem: Allow renaming while keeping MQTT connections working
Solution: When renaming happens, unsubscribe old topics, save new name to NVS, then subscribe to new topics
Challenge 5: Button Bounce
Problem: Physical buttons send multiple signals when pressed once
Solution: Added software debouncing and used a task queue to handle button presses reliably
Challenge 6: Learning Flutter
Problem: Limited Flutter experience but needed working app fast
Solution: "Vibe coded" it - built basic features first, then improved the UI based on testing
What I Learned
- Full-Stack IoT: How to build an IoT product from hardware to cloud to mobile app
- Embedded Systems: ESP-IDF framework, FreeRTOS, and GPIO management
- IoT Protocols: How to use MQTT, BLE, and TLS in real projects
- Safety: How to safely design circuits that handle high voltage
- User Experience: Making IoT devices easy to set up and use
- State Sync: Keeping multiple interfaces (physical, mobile, cloud) synchronized
- Mobile Dev: Building cross-platform apps with Flutter
Future Improvements
- Add voice control (Alexa, Google Home)
- Monitor energy usage with current sensors
- Add scheduling and automation
- Support multiple users
- OTA firmware updates
- Work with Home Assistant and OpenHAB
- Create scenes and macros
- Design a PCB instead of using perf board